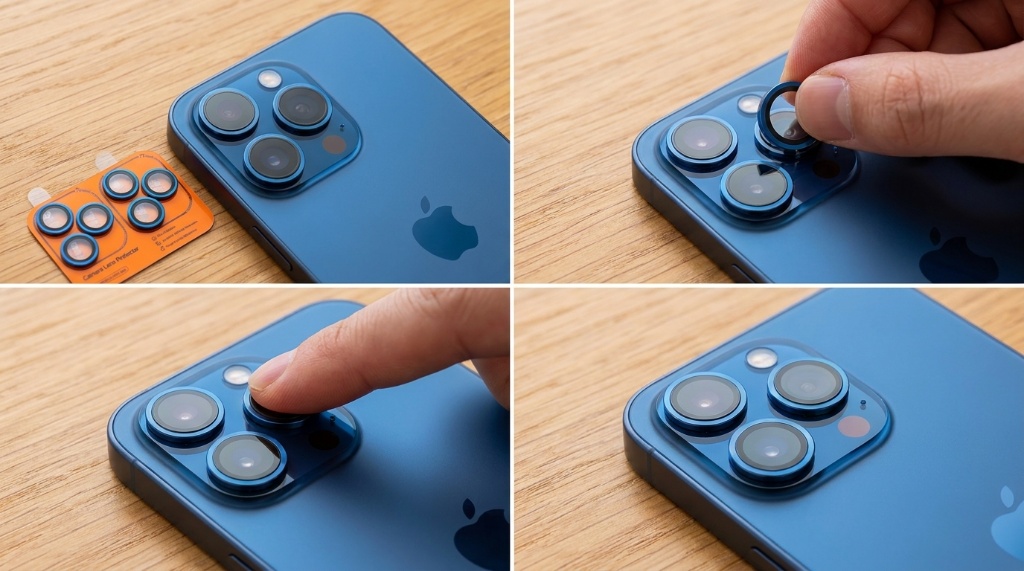
Installing the Tocol iPhone 17 Pro Camera Lens Protector takes about five minutes and needs only a clean surface and steady hands. First, wipe the camera plateau free of oil and dust. Next, align the protector over the three lenses and press it down evenly. Most failures come from trapped dust, not from the protector itself. Because the iPhone 17 Pro camera plateau is wide and slightly raised, alignment matters more than pressure. A properly seated protector keeps the lenses flush and preserves photo clarity. If you want to see what ships in the kit before you begin, the Tocol iPhone 17 Pro Camera Lens Protector page lists the included accessories. The steps below cover preparation, alignment, and fixes for common mistakes.
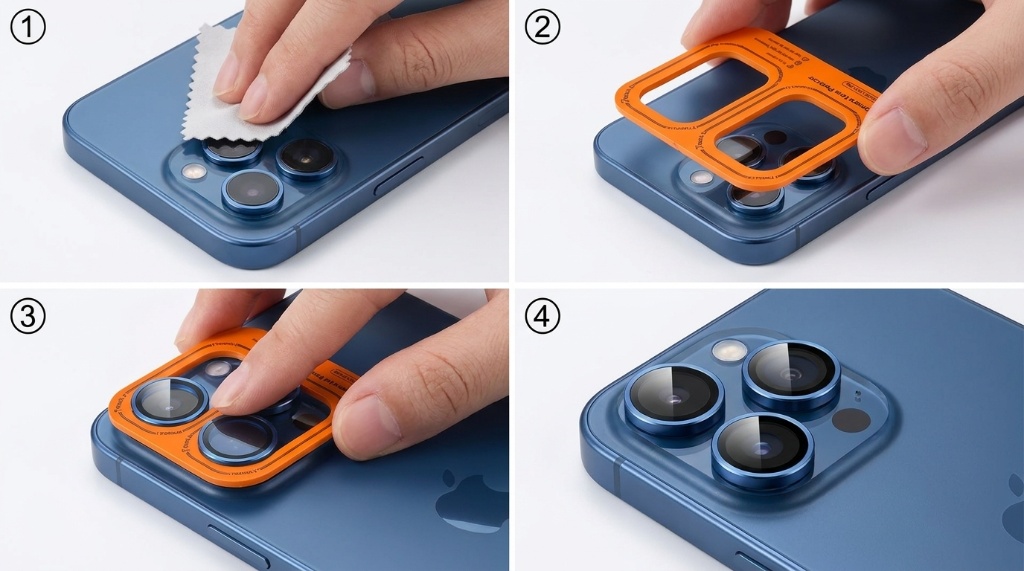
Clean the camera plateau with the alcohol wipe, dry it with the microfiber cloth, and lift any remaining dust with the sticker. Peel the backing off the protector, align it over the three lenses, and lower it slowly. Press from the center outward for ten seconds. Avoid touching the adhesive side, and work in a low-dust room to prevent specks under the glass.
Key Takeaways
- Dust control matters more than pressure, so clean the plateau twice before peeling any backing.
- Align the protector over the three lenses first, then check the flash and microphone openings.
- Press from the center outward to push trapped air toward the edges.
- Wait a few minutes before installing a case so the adhesive can settle fully.
- Remove and reapply only if you have a spare protector, since adhesive loses grip after one lift.
What Comes in the Kit and What You Need
Most camera lens protector kits ship with the glass piece, an alcohol wipe, a microfiber cloth, and a dust removal sticker. Some versions also include a plastic alignment frame. Check your package contents before you start, because missing tools change your approach. You will also want a clean, well-lit table and roughly five minutes of uninterrupted time.
Tools worth having nearby
- A bright lamp or a second phone with the flashlight on
- A lint-free cloth in case the included one picks up oil
- Tape for lifting stubborn dust specks without touching the glass
- A soft surface so the phone does not slide while you work
Consequently, a little setup saves you from peeling and reapplying the protector. That matters, because most adhesives weaken after one removal.
Prep the Camera Module Before Anything Else
Dust is the main reason lens protectors look cloudy or develop bumps. Start by wiping the camera plateau with the alcohol pad. Then dry it immediately with the microfiber cloth. Next, press the dust sticker onto the plateau and peel it away slowly. Repeat the sticker step two or three times if you see any particles under bright light.
Meanwhile, wash and dry your hands. Finger oils transfer easily to the adhesive side of the protector. Also, avoid working near pets, carpets, or fans that push lint through the air.
Step-by-Step Installation
- Hold the phone with the camera facing up on a stable surface.
- Clean the plateau with the alcohol wipe and let it dry for a few seconds.
- Buff the surface with the microfiber cloth until it looks streak-free.
- Lift remaining dust with the sticker, checking under a bright light.
- Peel the protective film off the protector, holding only the edges.
- Align the cutouts over the three lenses and lower the glass slowly.
- Press from the center outward for about ten seconds.
- Wipe the surface once more and check for bubbles or dust.
If you notice a speck before pressing, lift the protector gently and repeat the dust sticker step. Once the adhesive has fully bonded, lifting becomes risky.
Alignment Tips for the iPhone 17 Pro Camera Plateau
The iPhone 17 Pro has three rear lenses arranged in a triangular layout on a raised plateau. That shape leaves little room for error, so the cutouts must sit precisely over each lens. Otherwise, the protector may cover the flash, the microphone, or the LiDAR sensor. Any of those blockages can affect photos, video audio, or autofocus performance.
In addition, check the edges of the plateau after placement. The protector should sit flat without overhanging the frame. If it overlaps the phone’s edge, a case may push it loose later.
When a Lens Protector Helps and When to Skip It
A lens protector makes sense if you often set your phone face-down on rough surfaces. It also helps if you work around sand, grit, or metal shavings. However, it is not a perfect solution for every user.
| Factor | With Protector | Without Protector |
|---|---|---|
| Scratch resistance | Higher for the glass surface | Relies on the native lens coating |
| Image clarity | Usually unchanged, sometimes slight glare | Unchanged |
| Case fit | May interfere with tight cases | No interference |
| Maintenance | Replace when scratched or cracked | Repair costs are higher if damaged |
Therefore, decide based on how you use the phone. If you shoot a lot of night photos, test a few shots after installation. Some users notice extra flare from bright light sources, while others see no difference at all.
Removal and Routine Maintenance
Clean the protector the same way you clean the lenses. Use a microfiber cloth, and avoid paper towels that can leave fibers behind. For stubborn smudges, breathe lightly on the glass and wipe again. Do not use household glass cleaner, since ammonia can damage coatings over time.
When you need to remove the protector, slide a fingernail under one corner and lift slowly. Then clean the plateau with alcohol before installing a replacement. If the glass is cracked but still attached, remove it promptly to avoid cuts.
Troubleshooting Common Problems
- Dust under the glass: lift one corner, use a dust sticker, and press back down.
- Misaligned cutouts: remove the protector and realign before the adhesive sets.
- Case lifting the edges: switch to a case with a deeper camera cutout.
- Blurry or flared photos: check for smudges, then test without the protector.
- Bubbles that will not move: press firmly outward from the center.
Furthermore, give the adhesive a few hours to settle before judging the result. Small edge bubbles often disappear on their own.
Frequently Asked Questions
Can I install the protector without an alignment frame?
Yes, you can align it by hand as long as you lower the glass slowly and check the lens cutouts first.
Will a camera lens protector affect photo quality?
In most cases image quality stays the same, though some users notice slight glare in bright or night scenes.
How long does the protector last?
It typically lasts until it cracks, scratches, or loses adhesion, which depends on your daily use.
Can I use a phone case with the protector installed?
Yes, but choose a case with a raised camera lip so the edges are not pushed loose.
What should I do if dust gets trapped under the protector?
Lift one corner gently, remove the dust with a sticker, and press the glass back down.
Conclusion
Installing the Tocol iPhone 17 Pro Camera Lens Protector comes down to three things: a clean plateau, careful alignment, and steady pressure. Skip the shortcuts, and you will avoid the dust specks and bubbles that ruin most first attempts. Once the protector is seated, clean it weekly and inspect the edges for lifting. If a corner starts to peel, replace the protector rather than pressing it back repeatedly. Take five minutes today, and your iPhone 17 Pro lenses stay protected for months.