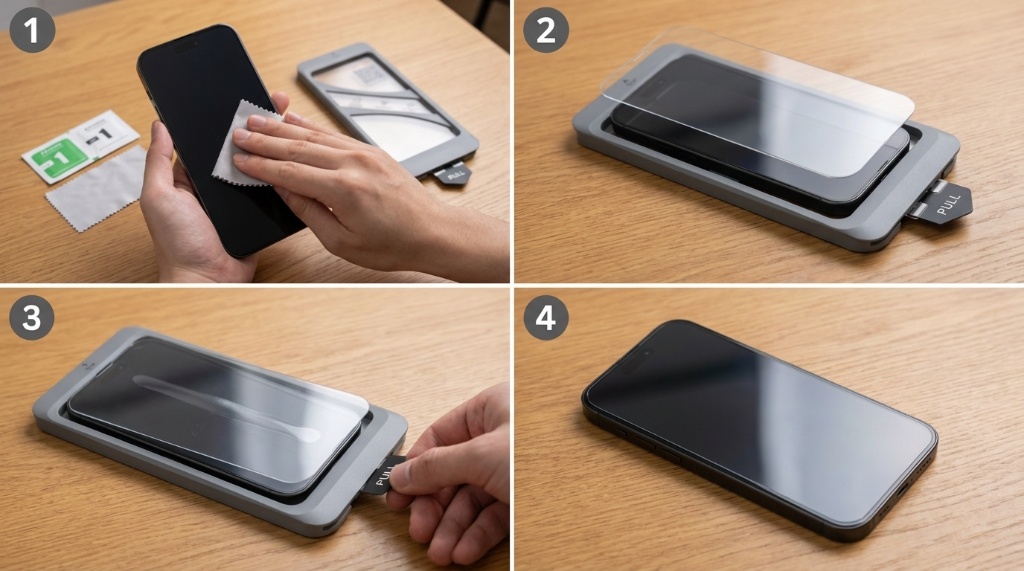
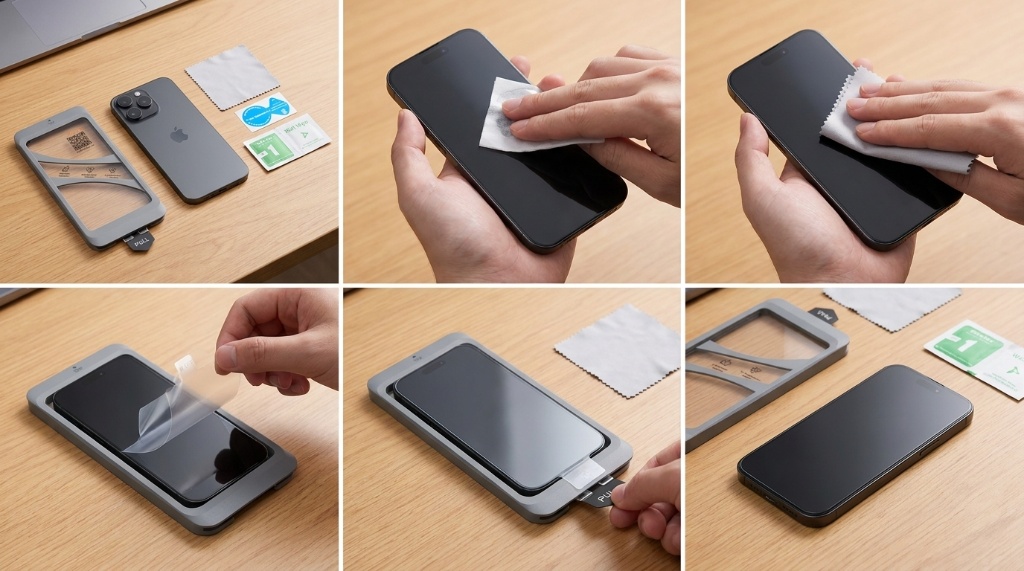
Installing a Tauri Screen Protector for iPhone 15 Pro Max takes about five minutes in a dust-free space. First, power off the phone and clean the screen. Then peel the adhesive backing and align the protector with the top speaker and side edges. Press from the center outward to push air toward the edges. A steady hand matters more than speed near the rounded edges. A visual guide like the Tauri Screen Protector for iPhone 15 Pro Max shows kit contents. It also shows placement. The steps below cover preparation, alignment, bubble removal, and common mistakes.
The safest method is to install the protector in a steamy bathroom after a shower. Use the included alignment tray and clean the screen with the provided wipe. Remove every dust speck with a sticker before peeling the adhesive. Align the top and bottom, then press from the center outward. Wait 24 hours before putting on a tight case.
Key Takeaways
- Work in a low-dust room, such as a bathroom after a hot shower.
- Use the alignment tray if your kit includes one to reduce edge misalignment.
- Remove dust before peeling the adhesive, since trapped particles cause permanent bubbles.
- Press from the center outward to push air toward the edges.
- Wait about 24 hours before using a tight case so the adhesive can settle.
What You Need Before You Start
Gather the Tauri kit, a microfiber cloth, dust removal stickers, and a clean workspace. Wash your hands and power off the iPhone 15 Pro Max. A powered-off screen stays black, so dust and smudges are easier to see. Also, remove any old protector and clean off adhesive residue.
Check the protector orientation before peeling anything. The top edge usually has a cutout for the front speaker. If you install it upside down, the edges will not sit flush. Therefore, compare the protector to the phone while the protective film is still on.
Step-by-Step Installation
Step 1: Prepare the Room and Phone
Run a hot shower for a few minutes to settle dust in the bathroom. Then, dry your hands and place the phone on a clean towel. Use the wet wipe from the kit to remove fingerprints and oil. Next, dry the screen with the microfiber cloth.
Step 2: Remove Every Dust Particle
Look at the screen under bright light from different angles. If you see a speck, lift it with a dust removal sticker. Do not use your finger, because skin oil can leave a mark. Repeat until the glass looks completely clear.
Step 3: Align the Protector
If the kit includes an alignment tray, snap the phone into it. Otherwise, hold the protector by its edges and line up the top cutout with the speaker. Then, lower it slowly while checking the side gaps. Keep the backing on until you are ready to apply it.
Step 4: Apply and Press
Peel the protective backing from the adhesive side. Starting at the top, lay the protector onto the screen. Let it settle naturally for a second. Then, press from the center outward with your thumb or the included squeegee. Work out any air pockets toward the nearest edge.
Step 5: Finish the Edges
Run your finger around the perimeter to seal the edges. If a corner lifts, press it down for several seconds. For stubborn edges, apply gentle heat from a hair dryer on low. Keep the dryer moving, and do not hold it in one spot.
How to Prevent Dust and Bubbles
Dust is the main reason a new protector looks flawed. Bubbles from dust are small, hard circles that do not move when you press them. Air bubbles, by contrast, often disappear within a day or two. Therefore, focus on dust removal before installation.
If a dust bubble appears after you apply the protector, do not panic. Lift the nearest corner with a piece of tape. Then, use a dust sticker to grab the particle. Slowly lay the protector back down and press the area smooth. This method works best within the first few minutes.
Common Installation Mistakes to Avoid
- Peeling the entire backing at once, which increases the chance of dust contact.
- Pressing the center first, which can trap air near the edges.
- Using a paper towel, which leaves lint behind.
- Installing in a windy room or near a fan.
- Putting on a tight case before the adhesive cures.
Each mistake is easy to avoid before you start. For example, peel only the top half of the backing first. Then, align the top edge and peel the rest as you press downward. This technique gives you more control.
Case Compatibility and Edge Lifting
The iPhone 15 Pro Max has a large display and rounded edges. Many cases wrap slightly over the front glass. As a result, a thick screen protector can collide with the case lip. That pressure may lift a corner over time.
Check case clearance before you commit to a protector. If the case pushes against the protector, remove the case and reseat the protector. In some situations, you may need a thinner protector or a case with a softer lip. Still, fit varies by model, so test the case after installation.
Maintenance and Replacement
Clean the protector with a microfiber cloth and a small amount of screen-safe cleaner. Avoid ammonia, alcohol, or abrasive pads, because they can damage the oleophobic coating. Wipe gently from side to side.
Replace the protector when it has deep scratches, chips, or cracks. A cracked protector can still protect the screen, but it may cut your finger. Also, replace it if the edges collect lint or the adhesive fails. A fresh protector restores clarity and touch response.
Troubleshooting Stubborn Problems
A Bubble Will Not Move
A moving bubble is usually air. Press it toward the edge with a squeegee. If it stays in place, it is probably dust. Lift the corner with tape and remove the particle.
A Corner Keeps Lifting
A lifting corner often means misalignment or case pressure. First, check that the protector is centered. Then, press the corner down for 30 seconds. If it still lifts, the adhesive may be contaminated.
Touch Sensitivity Feels Weak
A quality protector should not noticeably reduce touch sensitivity. However, a thick protector or trapped air can affect response. Re-press the screen and remove any bubbles. If the issue continues, check your case for pressure on the display.
Frequently Asked Questions
Can I install a Tauri screen protector without an alignment tray?
Yes, you can align it manually by lining up the top cutout and side edges before peeling the adhesive.
How long should I wait before using a case?
Wait about 24 hours before putting on a tight case so the adhesive can settle.
What should I do if dust gets under the protector?
Lift the nearest corner with tape, remove the dust with a sticker, and press the protector back down.
Will a screen protector affect Face ID on the iPhone 15 Pro Max?
A properly installed protector with the correct cutouts should not affect Face ID.
How often should I replace the protector?
Replace it when it has deep scratches, cracks, chips, or edges that no longer stick.
Conclusion
Installing a Tauri Screen Protector for iPhone 15 Pro Max is simple. Control dust and take your time. Prepare the phone and use the alignment tray. Press from the center outward, then let the adhesive settle before adding a case. If you notice a dust speck, fix it immediately with tape and a sticker. With a clean install, the protector will stay clear and secure for months. Check your kit contents, then start with a dust-free room and a steady hand.