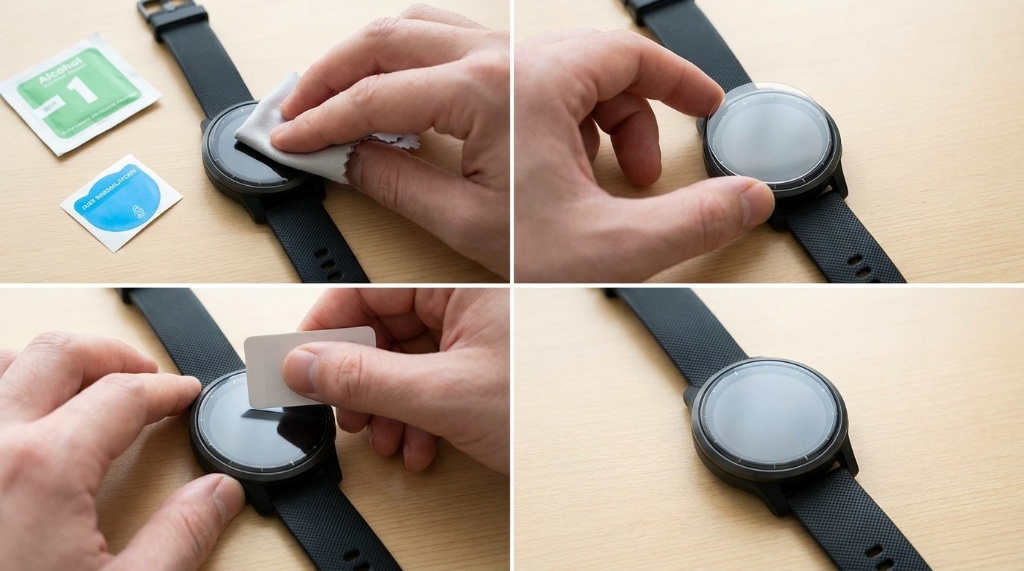
Install the LK Garmin Vivoactive 6 Screen Protector by cleaning the watch face, aligning the protector with the round bezel, and pressing from the center outward. Work on a dust-free surface with the watch powered off. Because the Vivoactive 6 has a circular display, alignment is the step most people rush. A steady hand and a clean screen matter more than firm pressure. Many users also prefer a wet-install film over dry glass for curved edges. If you want fit and material details before buying, this overview of the LK Garmin Vivoactive 6 Screen Protector covers the basics. The steps below walk through prep, alignment, and bubble removal.
Quick Answer
The fastest method is a dry install. Clean the screen with the alcohol wipe, dry it with the lint-free cloth, lift dust with the sticker, then align the protector using the bezel as a guide. Press from the center outward with the squeegee. Small bubbles usually fade within 24 to 48 hours. For curved edges or stubborn bubbles, a wet install gives you more time to reposition the film.
Key Takeaways
- Clean the screen twice, once with the alcohol wipe and once with the dry cloth, to cut dust before it lands.
- Align the protector with the bezel, not the display, because the round edge is your only reliable guide.
- Press from the center outward to push trapped air toward the edges instead of trapping it in the middle.
- Small bubbles often disappear on their own within two days, so wait before peeling anything off.
- Wet installs suit curved glass, while dry installs suit flat faces and users who want a glass feel.
- Replace the protector when edges lift or scratches blur the display, not when the surface looks slightly dusty.
What You Need Before You Start
Gather every tool before you touch the screen. Once the adhesive is exposed, you have limited time to place the protector correctly. Most LK kits include the essentials, but confirm each item is present first.
- Alcohol prep wipe for oil and fingerprint removal
- Lint-free microfiber cloth for drying and polishing
- Dust removal sticker for stray particles
- Rigid squeegee card for pushing air outward
- Alignment tray or frame if your kit includes one
- Clean, well-lit workspace away from fans and pets
Turn the watch off before you begin. A dark screen makes dust and bubbles far easier to see. Wash your hands as well, because oily fingertips leave marks that no cloth fully removes.
Step-by-Step Installation
Follow these steps in order. Skipping the cleaning stage is the single most common reason installs fail.
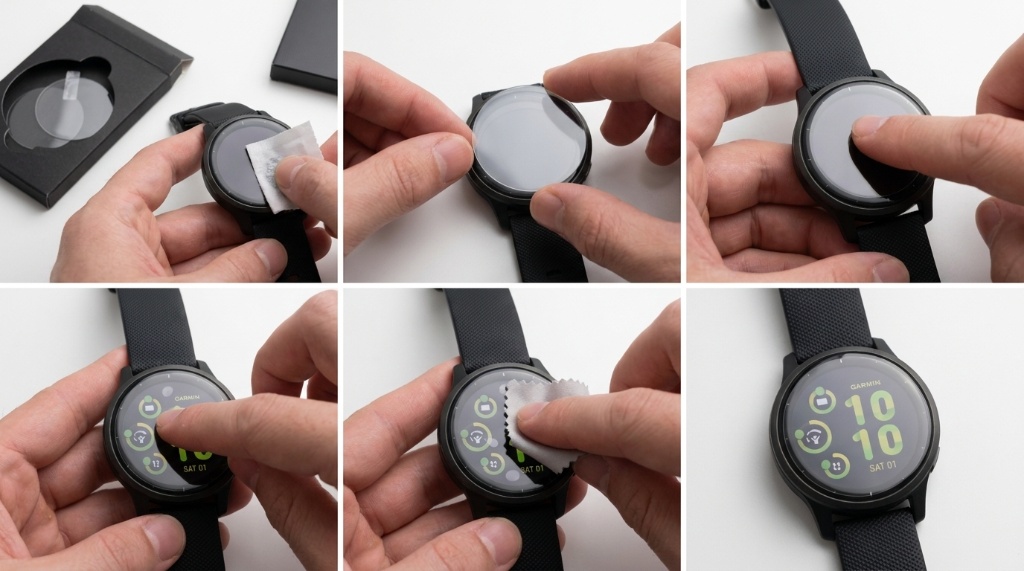
- Wipe the watch face with the alcohol wipe. Let it dry for a few seconds.
- Buff the screen with the microfiber cloth until it looks streak-free.
- Press the dust sticker onto the display and peel it off slowly. Repeat if you see specks.
- Peel the backing film from the protector, holding it by the edges only.
- Lower the protector onto the screen and line up the curve with the bezel.
- Let the adhesive touch down gently from one edge to the other.
- Press the center with your thumb, then work outward with the squeegee.
- Push trapped air toward the nearest edge in short, firm strokes.
- Lift and reposition within the first few seconds if the alignment looks off.
- Let the protector settle for 24 hours before heavy use or swimming.
For a wet install, spray the film and your fingertips with the supplied solution first. The liquid lets you slide the protector into place. Then squeegee the excess out and let the film cure overnight.
Wet Install vs Dry Install
Both methods work, but they suit different screens and different levels of patience. The table below shows where each approach wins.
| Factor | Dry Install (Tempered Glass) | Wet Install (TPU Film) |
|---|---|---|
| Difficulty | Moderate, one attempt | Easier, repositionable |
| Bubble risk | Higher on curved edges | Lower, liquid helps slide |
| Edge coverage | May lift on curved glass | Wraps curves better |
| Feel | Glassy and slick | Softer, slightly rubbery |
| Cure time | Immediate | 12 to 24 hours |
| Best for | Flat faces, scratch protection | Curved edges, impact absorption |
If your Vivoactive 6 has a domed or curved display, the wet install usually produces a cleaner result. If the face is flat and you want a glass feel, go dry. Neither method is wrong, but matching the method to the surface prevents most lifting issues.
Common Installation Mistakes to Avoid
Most failed installs share the same handful of causes. Avoiding them takes only a few extra seconds.
- Installing in a bathroom or kitchen where steam and dust circulate
- Touching the adhesive side with bare fingers
- Pressing hard before the protector is aligned
- Peeling the whole backing at once instead of gradually
- Ignoring a single dust speck because it looks tiny
- Removing the protector too soon to chase small bubbles
- Wearing the watch in water before the adhesive fully cures
If a speck lands after placement, lift one corner with tape, not a fingernail. Tape lifts the protector without bending it. Fingernails crease the film and leave permanent marks.
Troubleshooting Bubbles, Lifting, and Dust
Small bubbles in the center
Press them outward with the squeegee or your thumb. Most shrink and vanish within 24 to 48 hours as the adhesive settles. Do not peel the protector to chase them.
Bubbles trapped at the edge
These often come from misalignment rather than trapped air. Lift the nearest corner slightly and press the edge down again. If the bubble returns, the protector may be too large for the curve, and a film-style protector will fit better.
Dust under the protector
Lift the nearest edge with tape, use a fresh dust sticker on both surfaces, and press back down. Work quickly, because the adhesive weakens each time you lift it.
Edges lifting after a few days
Heat, sweat, and case friction cause edge lift. Press the edge down firmly after workouts, and avoid pressing the bezel against rough surfaces. If lifting continues, replace the protector.
Caring for the Protector After Installation
Once the adhesive cures, maintenance is simple. Wipe the surface with a microfiber cloth after workouts to remove sweat and oil. Avoid abrasive cleaners, since they dull the coating and reduce clarity. Check the edges weekly for lifting, especially if you swim or train outdoors.
Replace the protector when scratches blur the display or when edges peel back consistently. A worn protector still shields the glass, but it stops looking clean and starts catching light. Most users replace theirs every few months, depending on activity level.
Frequently Asked Questions
How long should I wait before wearing the watch after installation?
Wait at least 12 hours for a wet install and a few hours for a dry install before swimming or heavy sweating.
Can I reinstall the protector if I misalign it?
You can lift and reposition it within the first few seconds, but repeated lifting weakens the adhesive.
Will a screen protector affect touch sensitivity on the Vivoactive 6?
A thin glass or film protector rarely affects touch response, though thicker glass may feel slightly less sensitive at the edges.
Do I need to remove the protector before charging?
No, the protector does not interfere with charging, and it stays in place during normal use.
What should I do if bubbles remain after two days?
Lift the nearest edge with tape, clean both surfaces, and press the protector back down firmly with the squeegee.
Conclusion
A clean screen, careful alignment, and steady outward pressure do most of the work. Choose a dry install for a glass feel, or a wet install if your watch face curves. Give the adhesive time to cure, and resist the urge to peel the protector for small bubbles. If you have not ordered yet, compare materials and fit options first. Then set aside ten quiet minutes, follow the steps above, and your Vivoactive 6 will stay scratch-free for months.