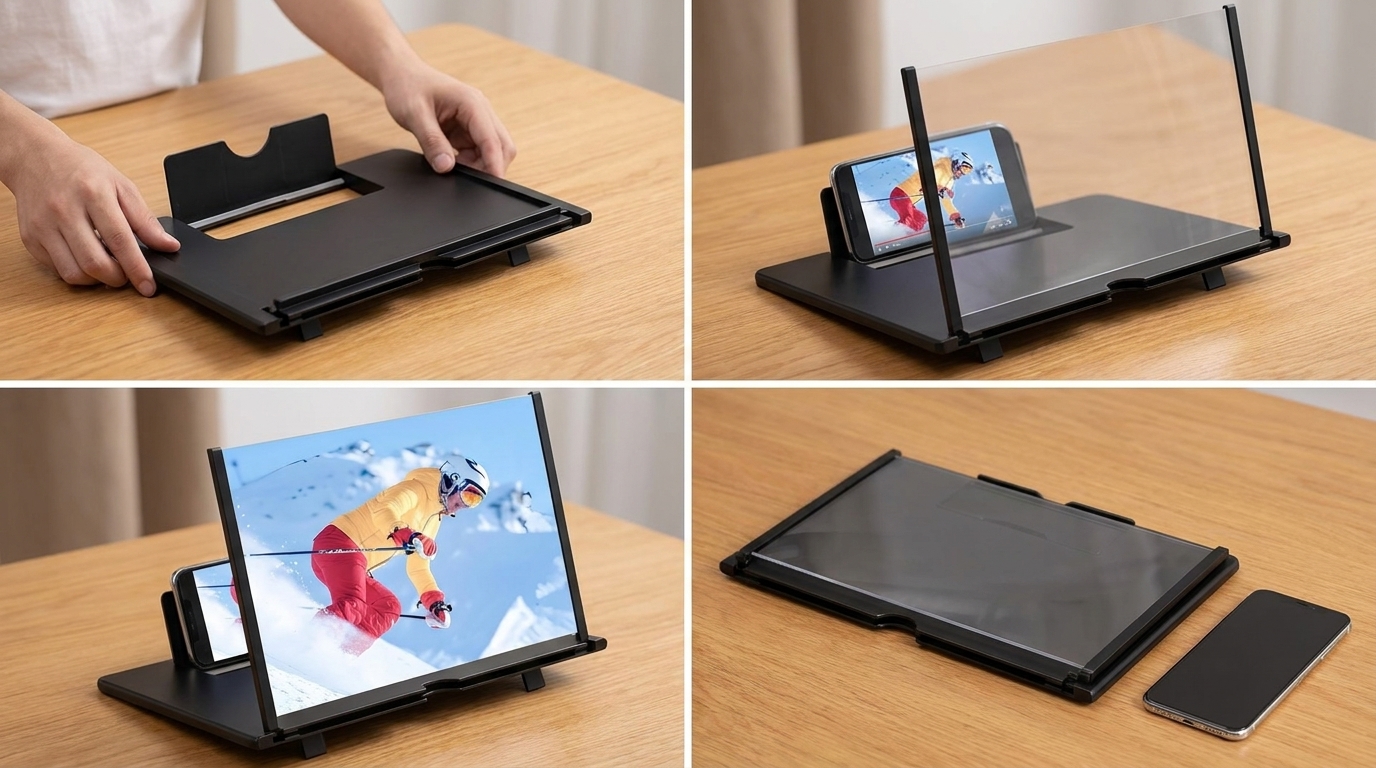
Using the Fanlory 20-Inch Phone Screen Magnifier takes about a minute. Unfold the frame, set your phone in the rear cradle, then slide the lens until the picture looks sharp. Most people get a blurry image at first because the phone sits too close or too far from the lens. Distance is the setting that matters most. A Fanlory 20-Inch Phone Screen Magnifier performs best on a stable table at roughly eye level. Dim the area behind the screen, and you can watch comfortably without holding your phone.
Quick Answer
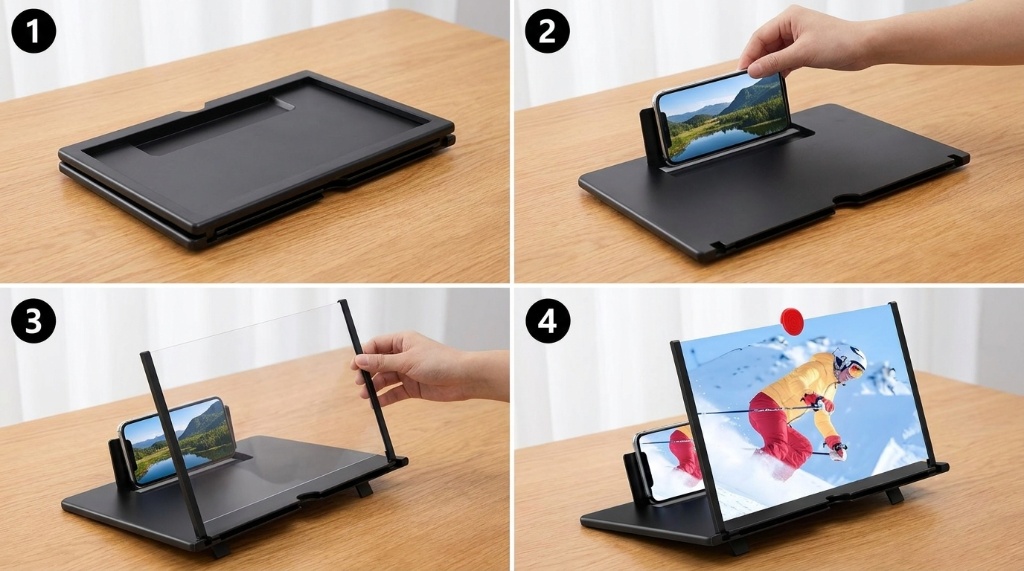
Set the magnifier on a flat, stable surface and unfold the frame completely. Place your phone in the rear holder with the screen facing the lens. Slide the phone or lens panel forward and back in small steps until the image snaps into focus. Then tilt the frame so the lens points at your eyes, and dim the light behind the screen for the brightest result.
Key Takeaways
- Focus comes from distance, not from any button or dial, so small sliding adjustments matter most.
- A wobbling table ruins the image faster than almost anything else.
- You must sit roughly centered in front of the lens, since side angles dim and distort the picture.
- This is a passive accessory with no batteries, cables, or apps required.
- Bright rooms wash out the image, so control light behind and around the frame.
- Touch input is awkward while the phone sits in the cradle, so queue up content first.
What You Need Before You Start
Most 20-inch phone screen magnifiers arrive as a foldable frame with a large Fresnel lens. The lens sits at the front, and a phone cradle sits at the back. Because of that design, you only need three things: a flat surface, your phone, and a little space behind the frame.
You do not need cables, batteries, or a companion app. The magnifier is completely passive. It simply bends light from your phone screen across a wider viewing area.
A stable table matters more than people expect. Any wobble shows up as a shaky, swimming image. Therefore, choose a desk, counter, or nightstand that stays still.
Step-by-Step Setup
Setup is quick once you know the order of operations. Follow these four steps, and you will avoid the usual blurry first attempt.
Step 1: Unfold the Frame Fully
Open the frame until the front panel and rear stand lock into place. Many models have a firm stop or slight click at the open position. If the frame feels loose, check that both side hinges are fully extended. A half-open frame changes the lens angle and softens the image.
Step 2: Place Your Phone in the Holder
Set your phone into the rear cradle with the screen facing the lens. Center it horizontally so the image does not skew to one side. A slim phone case usually fits without trouble. However, a thick rugged case may prevent the phone from seating flat, so remove it if the phone sits crooked.
Landscape orientation works best for video, while portrait suits scrolling and reading. Pick your orientation before you start focusing. Changing it later usually means refocusing again.
Step 3: Adjust the Lens Distance
This step decides whether the image is sharp or soft. Slide the phone cradle or the lens panel closer or farther until the picture snaps into focus. Move in small increments, because the sharp zone can be narrow. Once you find it, avoid bumping the frame.
Step 4: Fine-Tune the Viewing Angle
Tilt the frame until the center of the lens points toward your eyes. If you view from the side, the image dims and stretches. Sitting roughly centered delivers the brightest and clearest result.
How to Get a Sharp, Bright Image
Focus is only half the battle. Light control and seating position determine how good the final picture actually looks.
- Dim the wall or area behind the magnifier so stray light does not compete with the screen.
- Keep lamps and windows from shining directly onto the lens surface.
- Raise your phone brightness to a high level, since the lens spreads light over a larger area.
- Sit close enough that the image fills your view without cropping at the edges.
- Clean the lens before a long viewing session, because fingerprints scatter light.
Edge distortion is normal with Fresnel lenses. Text and details near the outer edges may look slightly stretched. For that reason, keep important content near the center of your phone screen.
Where It Works Best and Where It Falls Short
This accessory shines in specific situations and struggles in others. Knowing the difference saves you from disappointment.
It works well on a nightstand for bedtime video, on a kitchen counter for recipes, and on a desk for hands-free watching. It also helps when you want a larger picture without buying a television or tablet.
It does not work like a projector. The image stays on the lens surface, so you cannot throw it onto a wall. Bright daylight also washes out the picture badly. Off-axis viewing degrades quickly, which means it suits one viewer far better than a group.
Common Mistakes That Cause Blurry or Dim Images
Most complaints trace back to a handful of fixable habits. Check these before assuming the unit is faulty.
- Placing the phone too close to the lens, which creates a soft, glowing image.
- Viewing from an angle instead of sitting centered.
- Using the magnifier in direct sunlight or under a bright overhead lamp.
- Leaving a thick case on the phone so it does not sit flat in the cradle.
- Resting the frame on a soft surface like a bed, which shifts constantly.
Troubleshooting Quick Fixes
Use this table to diagnose problems fast. Each fix takes seconds to try.
| Problem | Likely Cause | Fix |
|---|---|---|
| Image looks blurry | Phone is at the wrong distance from the lens | Slide the cradle in small steps until focus snaps in |
| Picture appears dim | Room light is competing with the screen | Lower the lights and raise phone brightness |
| Edges look stretched | Normal Fresnel lens distortion | Move key content toward the screen center |
| Image shakes | Unstable surface or loose hinge | Move to a hard table and fully extend the frame |
| One side looks darker | You are sitting off-center | Shift your seat until the lens faces you directly |
Care and Storage
Dust is the main enemy of any lens-based accessory. Wipe the lens with a dry microfiber cloth before and after use. Avoid paper towels, which can leave scratches over time.
Fold the frame flat when you finish. Store it somewhere dry and out of direct sun. Heat can warp thin plastic frames, so skip the car dashboard on warm days.
Also, avoid leaving your phone in the cradle while charging for long periods. Trapped heat is not good for battery health.
Frequently Asked Questions
Does the Fanlory 20-inch magnifier need batteries or power?
No, it is a passive optical accessory that works entirely through its lens and requires no power source.
Why is my image still blurry after adjusting the distance?
Check that the frame is fully unfolded and the phone sits flat in the cradle, since a tilted phone prevents sharp focus.
Can two people watch at the same time?
It is possible but not ideal, because the image dims noticeably for anyone sitting off to the side of the lens.
Can I use it for reading ebooks and articles?
Yes, though you should keep text near the center of the screen to avoid edge distortion.
Can I touch the phone screen while it is in the holder?
You can reach it, but the frame may shift, so it is easier to set up your content before focusing.
Conclusion
The Fanlory 20-Inch Phone Screen Magnifier rewards a little patience during setup. Unfold it fully, seat your phone flat, then slide until the image snaps into focus. Sit centered, control the light, and keep the lens clean for the best picture. If the image looks soft, adjust distance before blaming the device. Set yours up on a stable table tonight, dial in the focus, and enjoy a bigger screen without buying new hardware.